We’ll use ChatGPT to create a simple extension, QuikNote, that takes quick daily notes right from the browser.
Here’s the demonstration of the QuikNote extension we’re building ->
Here's the full Step-by-Step tutorial with prompts.
Set the Scene first
The main goal of your prompt is to make ChatGPT DO things rather than make it think.
It messes up badly when it has to figure out most of the things on its own.
Having zero ambiguity is the key to awesome prompts.
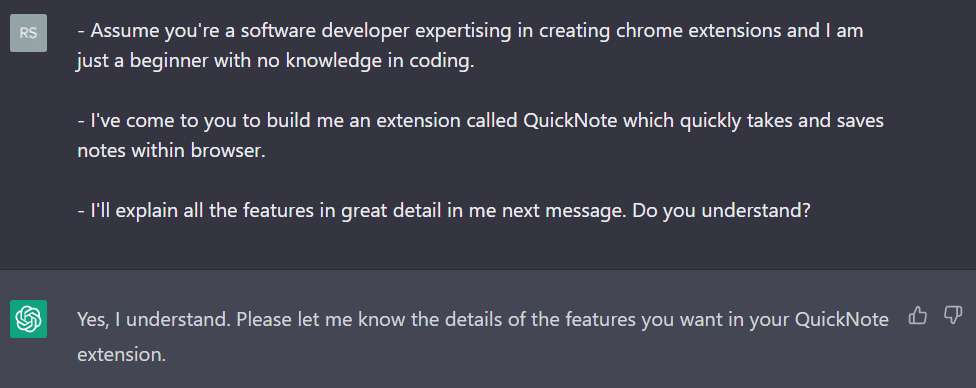
EXTREMELY PRECISE requirements
Explain requirements in great detail. Be very precise about what you want it to do.
High-level requirements will make ChatGPT to take many decisions on its own and trust me, you don’t want that.
You want ChatGPT to always think less and DO more.
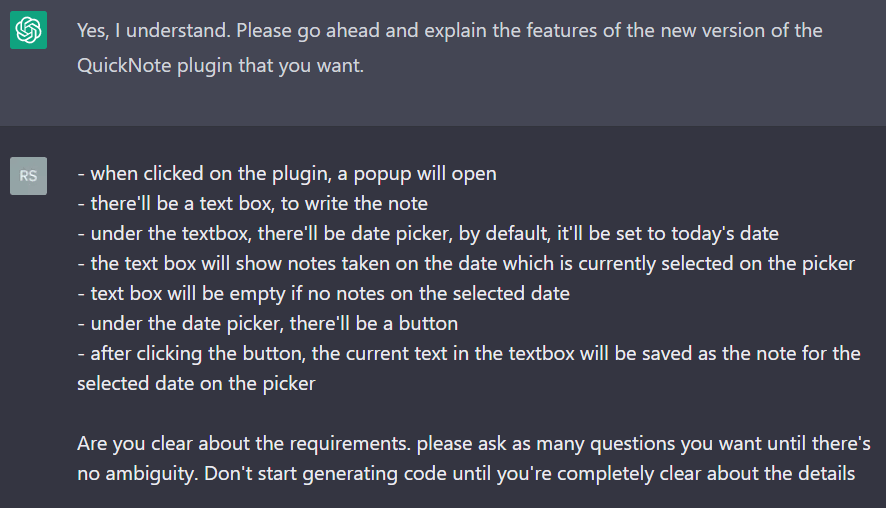
Notice here how I laid out every single requirment in great detail. Try to be very specific and to-the-point.
Ask ChatGPT for Clarifications
Ask ChatGPT to ask YOU questions about clarification.
This is a great way to remove any kind of ambiguity. If ChatGPT ain’t sure about something, it’ll assume artitrary things and more likely to make mistakes.
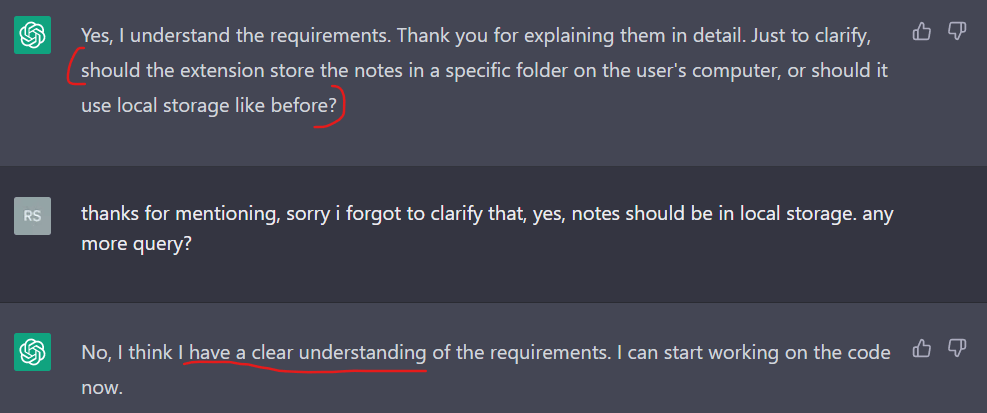
See above, how I asked ChatGPT to ask for further clarifications.
Then it actually came up with a valid question which could’ve caused ambiguity.
Coding the extension
After clarifying the requirements, I asked ChatGPT to generate all the codes required for making this extension.
It generated 4 files. Here’s the contents of those files ChatGPT generated.
manifest.json
- It contains metadata about the extension.
{
  "name": "Quiknote",
  "version": "1.0",
  "description": "A simple note-taking extension for Chrome",
  "permissions": [
    "storage"
  ],
  "manifest_version": 3,
  "action": {
    "default_popup": "popup.html",
    "default_icon": {
      "16": "icons/16.png",
      "48": "icons/48.png",
      "128": "icons/128.png"
    }
  }
}
popup.html
- To create the UI for the extension.
<!DOCTYPE html>
<html>
  <head>
    <title>QuikNote</title>
    <link rel="stylesheet" href="popup.css">
  </head>
  <body>
    <div class="container">
      <h1>QuikNote</h1>
      <textarea id="note"></textarea>
      <br>
      <label for="date">Date:</label>
      <input type="date" id="date">
      <br>
      <button id="save">Save</button>
      <div id="notes"></div>
    </div>
    <script src="popup.js"></script>
  </body>
</html>
popup.js
- Contains the logic of the extension.
// Get the UI elements
const noteTextbox = document.getElementById('note');
const datePicker = document.getElementById('date');
const saveButton = document.getElementById('save');

// Set default date to today
var now = new Date();

var day = ("0" + now.getDate()).slice(-2);
var month = ("0" + (now.getMonth() + 1)).slice(-2);

var today = now.getFullYear()+"-"+(month)+"-"+(day) ;

datePicker.value = today;

// Load the note for the currently selected date
loadNote();

// Set up event listeners
datePicker.addEventListener('input', loadNote);
saveButton.addEventListener('click', saveNote);

function loadNote() {
  const date = datePicker.value;
  const note = localStorage.getItem(`quicknote-${date}`) || '';
  noteTextbox.value = note;
}

function saveNote() {
  const date = datePicker.value;
  const note = noteTextbox.value;
  localStorage.setItem(`quicknote-${date}`, note);
  alert('Note saved!');
}
popup.css
- For styling the extension
body {
  margin: 0;
  padding: 0;
  background-color: #1d1d1d;
  color: #fff;
  font-family: 'Segoe UI', Tahoma, Geneva, Verdana, sans-serif;
  width: 400px;
}

.container {
  padding: 20px;
}

h1 {
  margin-top: 0;
}

label {
  display: block;
  margin-top: 10px;
}

input[type="date"] {
  border: none;
  padding: 5px;
  background-color: #3f3f3f;
  color: #fff;
  border-radius: 5px;
}

textarea {
  width: 100%;
  height: 150px;
  padding: 5px;
  border: none;
  background-color: #3f3f3f;
  color: #fff;
  border-radius: 5px;
  resize: none;
}

button {
  margin-top: 10px;
  padding: 5px 10px;
  border: none;
  background-color: #007bff;
  color: #fff;
  border-radius: 5px;
  cursor: pointer;
}

button:hover {
  background-color: #0056b3;
}

#notes {
  margin-top: 20px;
}

.date-header {
  font-size: 1.2rem;
  font-weight: bold;
  margin-bottom: 10px;
}

.note {
  margin-bottom: 10px;
}
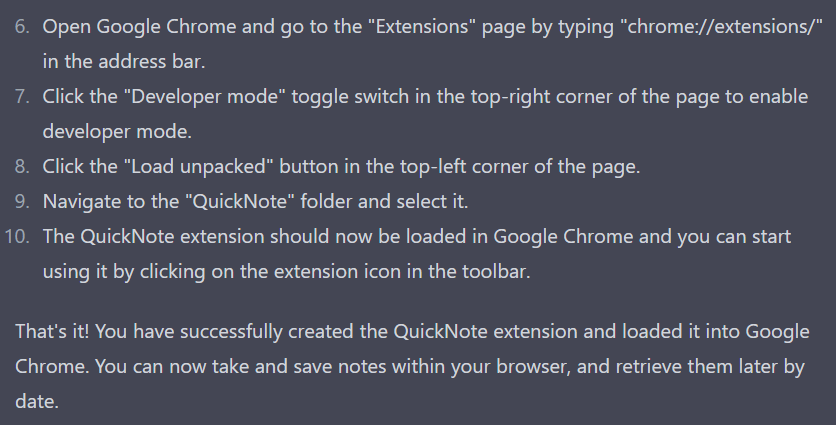
Install the extension
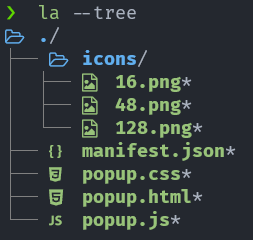
Then ChatGPT told me how to structure these files in the extension directory. Here’s the folder structure it suggested.
It also gave me step-by-step instructions on how to install QuikNote.
A few gotchas
ChatGPT definitely did a great job coding the extension.
But it did make some silly mistakes on the way which I had to debug and fix manually.
These are the mistakes it made 👇
-
In
getElementById(), it used the wrong Id from HTML -
It forgot to add
storagepermission onmanifest.json -
It added the JS script inside
<head>tag of HTML instead of adding it just before the end of<body>tag.
I tweet about these topics and anything I’m exploring regularly. Follow me on twitter